Table of Contents
- Introduction
- Step 1 – The Observation
- Step 2 – Sketching The View
- Step 3 – Scanning, Inverting and Cleaning Up the Sketch
- Step 4 – Softening Star Edges
- Step 5 – Adjusting contrast
- Step 6 – Adjusting White Star Cores
- Step 7 – Adding Color
- Step 8 – Adding Additional Glow
This tutorial covers the methods I have been using to create some of my recent double star sketches. For the digital portion, I will discuss methods used in Adobe Photoshop CS2. These techniques should translate pretty well to earlier versions of Photoshop as well as The Gimp. The double star I use as an example is Struve 3053–a surprising and beautiful yellow and blue pair in Cassiopeia.
Aside from soaking up and enjoying the view of the double, the key things I want to record as accurately as possible are the position angle of the stars, their separation, their relative magnitudes, any discernible color, and the context of any surrounding stars.
The first thing I make note of is color. For me, the impression of color is strongest during that first look through the eyepiece. (Even under conditions where I’m never strongly dark adapted.) So I’ll immediately note what colors stand out. I start with looking for the basics: Red to Orange to Yellow to White to Blue and shades in between. Sometimes, as you may have noticed, the contrasting colors a double throws at you don’t follow the rules. So from there I’ll just throw a description right back at it that reminds me of something I’m familiar with, like ‘key lime pie green’. I haven’t brought colored pencils or pantone swatch books into the equation for this. I just try to be as descriptive as possible with any colors that don’t fit the mold.
When it comes to estimating position angle, I have to lay some groundwork. I don’t own a filar micrometer, so my estimates aren’t of any scientific use, but I try to get as close as I can. To do this, I try to mark cardinal directions around the sketch as carefully as I can ahead of time. Since I have an equatorial telescope with a polar alignment scope, I’ll perform a polar alignment before observing. Then all I need to do is nudge the declination axis back and forth a couple times to note North-South. If you are using an alt-azimuth scope or otherwise won’t be doing polar alignment on an EQ scope, paying careful attention to East-West drift of stars through the field will also allow accurate placement of cardinal directions. With those directions noted around the sketch circle, I move on to estimating position angle of the stars based on an imaginary clock face.
Estimating the separation of the double isn’t a precise science for me either. For widely separated stars, I just try to determine what fraction of the field of view separates them: one-tenth…one-twentieth & so on.
[Edit – March 01, 2008: Note that in late 2007, I began using a Meade Astrometric Eyepiece with a few modifications to bring some control to my PA and separation measurements. A step-by-step article describing my current process with this eyepiece can be found here: Measuring Double Stars.]
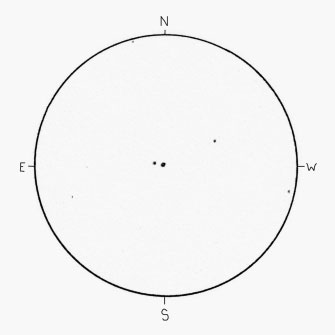
Once I’ve spent some time observing the double, I start to sketch the double star and any stars I see in the view using a 2H pencil. The reason I like to use a harder lead at this point is that it allows me to lightly plot the stars so that the faint stars are nice and delicate right from the start. It also makes any need for erasing a lot easier at this stage if I decide I need to correct something. After the stars are plotted where they belong, I use that same 2H pencil with a little more pressure and swirling to bulk up the boldness of the brighter stars. If a particularly bright star demands it, I’ll use an HB weight pencil. This is of course my personal preference. You may prefer to use a #2 or HB pencil exclusively, or even pen and ink. Use what you are comfortable with. (See Figure 1)

Figure 1
I prefer to attribute the colors of the primary and secondary in my written notes. If the stars are so similar in magnitude that it’s hard to tell which is primary or secondary, I will use cardinal directions to describe them (e.g. the northeast star vs the southwest star). If you have a view that is fairly heavy with stars and you are seeing color in other places, you may need to resort to noting color directly on the sketch. In this case, I will lightly abbreviate a color notation next to the star, such as YO = yellow-orange, LB = light blue, etc. When you scan and clean up the sketch later, you will have an opportunity to clone out/erase that notation from the image.
Step 3 – Scanning, Inverting and Cleaning Up the Sketch
With the sketch finished, the next step is to scan it. For a few thoughts on scanning sketches, see the Scanner Peculiarities section of my Digitizing Tutorial. You can scan either as RGB color or as Grayscale. But if you intend to add color, you will need to convert a grayscale file to RGB somewhere before step 5. If you scanned as an RGB color file, be sure you don’t have a color cast in your image–such as a yellowish tint from the paper. If you do have a color cast, a quick fix is to convert the image to grayscale, and then convert it back to RGB.
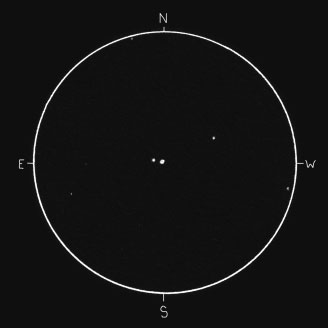
Next, you will need to ‘invert’ the sketch which will give you a black background with white stars (see Figure 2). In Adobe Photoshop CS, this command is found under the following menu: Image > Adjustments > Invert.

Figure 2
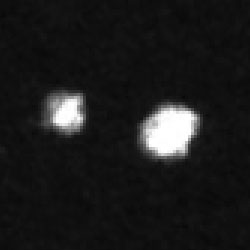
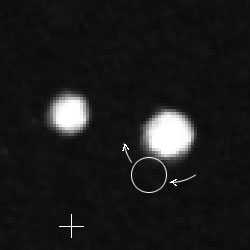
Next, I like to do a little clean-up on the double star members, and perhaps on some of the brighter field stars. I try to find a balance between cleaning up any obvious imperfections in the stars I sketched (see Figures 3 and 4), and making them too perfect. Right now I’m not trying to produce purely digital sketches. I still like to keep some of the hand drawn appearance wherever I can. To clean up, I use the ‘clone’ tool (a.k.a. ‘rubber stamp tool’). For a description on how to use this tool, see the Image Cleanup section of that same Digitizing Tutorial.

Figure 3

Figure 4
PAGE 1 OF 4
— Next Page —
Love your sketches. I have been practicing and hope one day to get as good as you. I am a fan of Doubles, for measurements but just started with sketching. Have you a recommendations for color pencils to use for the Reds, Yellows and Blues?
Regards,
Tom Collins Jr, WI3P
tom041652[[a_._t]]mchsi[[d_o_t]]com, tom041652[[a_._t]]yahoo[[d_o_t]]com
Celestron C8-SGT /Nextar CG-5 Mount
Meade 290 60mm Refractor EQ Manual Mount
38.5714N 75.2875W Millsboro, Delaware USA
“Pluto will always be a Planet to me!!!”
Hi Tom, thank you. Although I currently prepare color for my double star sketches using digital tools, I have experimented with colored pencils as well. My experience has been that regular colored pencils are not robust and opaque enough to display well on black paper. Pastel pencils on the other hand seem to work very well. If you are interested in experimenting with them, take a trip over to Blick Art Supplies. That link will take you to their pastel pencil selection. You can purchase individual pencils from different brands. I picked up the following colors from Conté:
Red
Scarlet
Orange
Gold Yellow
Yellow
White
Sky Blue
Light Blue
Those cover the basic stellar spectrum. The following are for working on green tints to bright nebulosity.
Prussian Green
Grey Green
I also got picked up yellows from Faber Castell, Cretacolor and CarbOthello for comparison. They all worked nicely.
One thing you’ll want to do is mark the pencils ahead of time so you can tell one color from another the first time you are out sketching under a red light. Also, be sure to get some spray fixative and apply it to your sketches since pastel media will smudge very easily. I hope that helps a bit.
Have a great time and thanks for commenting,
Jeremy
A great great great tutorial! Thank you for sharing! You have a wonderful attitude and your site is rich, beautiful, and neatly laid out.
I have been drawing the Moon and double stars for 50 years. My technique for Moon drawing is quite elaborate and I dont use the computer (I just scan the final drawing to share the result with friends). My drawings of double stars were always very crude black and white pencil sketches… but when I saw your drawings I wanted to emulate your technique… your explanations are very clear. You are a man with many gifts!
If you ever publish your double star drawings, PLEASE, put me on your mailing list!
Un grand merci de Quebec
l’Ami Jacques
p.s.) If you want a Moon drawing JPG, I’ll gladly send you one. Just tell me how.
Jacques Thibault
Dear Jacques,
Merci beaucoup pour vos commentaires.
I’m glad the tutorial was helpful. I’m sorry I didn’t reply sooner, I saw the outstanding Lunar sketch that you submitted to ASOD. Beautiful work! Please continue to submit more as you are able. It will be a pleasure to see them.
I’ll keep your request about the double star drawings in mind. 🙂
In the meantime, they are picked up occasionally by Astronomy Now (UK) and Sky and Telescope.
I hope you’re having a wonderful week, and that you get a chance to work on some more double star and Lunar drawings!
Jeremy