If you are like me, your sketches will have some unintentional flaws. I leave it up to you whether you want to “Go Commando” and leave those rough edges in for a more raw expression of your work. I respect that. (You buy organic don’t you 😉 Now, if you do want to tidy up a bit, there are some things to look for: not-quite-round stars, accidental pencil drag marks, stars you have crossed out for later deletion, unintentional specks on the scanner glass (really watch for these–compare to your sketch–you don’t want specks in there that aren’t actual stars you drew), etc. When correcting these problems, I like to use the clone tool (rubber stamp). It offers the best chance of painting out problems without leaving a trace. Using a regular paint brush can work, but you risk leaving brush marks if not all areas of your background are perfectly smooth and the same color and shade.
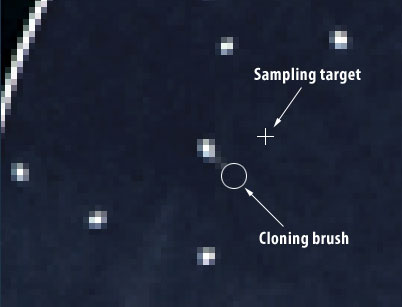
Grab your clone tool, and select a brush size for it that is appropriate for the size of the corrections you want to make. Usually, the smaller the better. Give it a soft edge if you can. Now go to all those areas that need to be removed. Hold down the option/alt key and click a spot near your correction (Fig. 25) that has the same shade as you want to appear in place of the bad spot (this is called “sampling”). Release option/alt, and click on the schmutz (Fig. 26). Be sparing in your clicking. Do only as much as you need to remove all traces of it. For stars that aren’t quite round, zoom in nice and close and carefully clone your way into it to get rid of any oblongness or streakiness. Pay attention to how soft or hard your clone brush is here, so that the correction doesn’t make one half of the star fuzzy and the other end solid. Try to keep it consistent. Work your way around the sketch, and when you are done, zoom out to a magnification of 100% and assess the situation.
Figure 25: Clone Sampling. Holding down the option/alt key activates the sampling target. Click the mouse button to target that area.
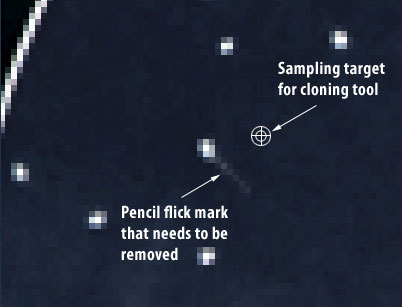
Figure 26: Cloning out stray marks. The crosshair shows where the clone data is being retrieved from.
At this point, you are ready to add any color you noted during your observation. I’ll cover this in two parts. Nebulosity color, and star color.
Nebulosity color
If you noticed any nebulosity color, start with this first, since it will wipe out any overlapping star color. I have seen greenish hues in M42, blue-green in M57, and cyan color in Comet Machholz. If you are fortunate enough to have a large scope, you will probably have even more opportunity to note and employ color in nebulous objects if you so desire.
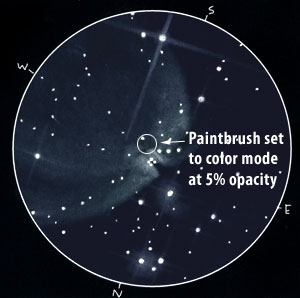
First, grab the paint brush tool, and select a very soft brush that is smaller in size than the nebula you sketched. You want to allow some level of detail as you paint. Try a size that is 1/4 the diameter of your nebula to start with, and see how it works. Next, click on your foreground color square in the toolbox and select the color that best matches what you observed. When you look at the color square before you, I would advise keeping the color pure and choosing from an area at the top of the square. Click OK for the color selection. Now change the mode of your brush to “Color” and the Opacity somewhere from 1-10%. Now start to brush in color on the nebula (Fig. 27). Each time you release the mouse button and overlap brush strokes, you will make the color more intense. Be careful with this. I like to hold the mouse down for my entire first brush over the whole nebula, then I come back and intensify some of the brighter areas (Fig. 28), leaving the dimmer areas with less color intensity. The undo key is your friend here. Don’t be afraid to use it. It can be easy to overdo the color.
Figure 27: Applying overall light color with a large brush.
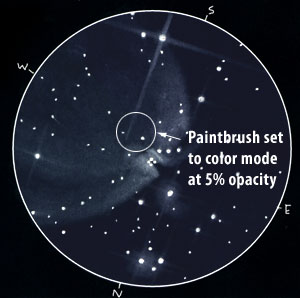
Figure 28: Applying more overlapping color with a smaller brush in the brighter areas.
Star color
When you are ready to apply color to any notable stars, grab a brush that is slightly larger than the star. Make sure the brush is in “color” mode, and set the opacity from 50-100%. Now go to the foreground color selector and choose the appropriate color. I now keep star colors in my swatch palette for simplicity and consistency (Fig. 29). Add them to your swatch palette as you make them. Next, move your brush directly over the star and click once or twice to dab the color on (Fig. 30). If it is too intense, undo the action, change the opacity to a lower number and try again. If you drew diffraction spikes on your brighter stars (you are my hero), use a low opacity and brush along the spikes (Fig. 31). Overlap some strokes along the spikes closer to the star so the color gets more intense there.
Figure 29: Photoshop swatch palette with commonly used celestial colors.
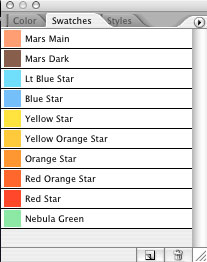
Figure 30: Adding color to a star with a soft paintbrush set to color mode at 50% opacity.
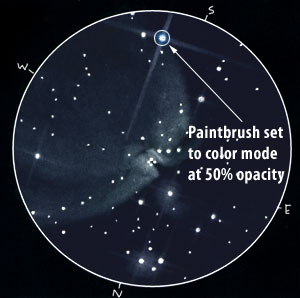
Figure 31: Adding color to diffraction spikes with a soft paintbrush set to color mode at 10% opacity.

What about sharpening?
I used to sharpen my sketches to help pop the stars out better. But I began to notice that this took some of the life out of the sketches. They felt overly-flat to me. That certain amount of natural softness is what gives the stars a glowing quality. So I no longer use the Unsharp Mask filter. That’s not to say it can’t have it’s uses, but I would be a bit wary that it doesn’t do more harm than good.
————-
So that’s it. Or is it? You may have other things to care for with your sketch, such as labels or rollover animations or who knows what. But for the scope of this tutorial, your image is now ready to save and upload to the web.

PAGE 6 OF 7
— First Page | Previous Page | Next Page —